Thursday, November 24, 2011

Cheap Laundry Soap


I've been making my own laundry soap for a while, but in much smaller batches. This is a similar recipe to what I've been doing, but on a much larger scale. I'm starting to find that with the more practical daily things I make (soap, lip balm, laundry soap, shampoo) that the trick is to make large batches infrequently. This way you aren't constantly trying to keep up with the demand of using it. Plus, for many items, soap especially, it is just as easy to make a large batch as a small one.


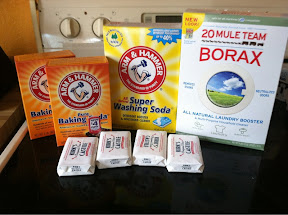
I found this recipe on Pinterest (can't tell that I'm loving that site, can you?). Really though, the proportions are identical to several recipes I've found. The nice thing about this recipe is that there is no measuring. All you need is around 15 oz of soap, 1 (4 lbs) box Borax, 1 (4 lbs) box washing soda, 2 (2 lbs)boxes of baking soda. Don't bother being exact about the soap, the bars I have are about 4 oz. Eventually I would like to switch to using my homemade soap for this, but I was short at the time so I used a pure coconut soap. The only thing to remember for the soap, is to use soaps with animal fats or those with a high concentration of saturated fats. Olive and vegetable oils tend not to wash away completely. Vegetarians can use a coconut oil soap like I used above. Some recipes call for fels naphtha soap, which is a solid laundry detergent bar. I passed on this because I'm pretty picky about ingredients and the listings on the package are pretty vague. Part of the DYI benefits are controlling what you are exposed to, after all, so why not be picky?


Let the grating begin! Ok there is an easier way... A food processor with a grater attachment makes quick work of this. Really though, if you have a TV show or a movie you want to watch, just sit down and grate the soap while you relax.


One piece of advice here... I would mix it all in a garbage bag next time. Everything involved is a fine powder and it's hard to mix without breathing a bunch of it. Not too fun. Next project is to get a container to hold it all in.

Above may not look like much (even the picture doesn't really do it justice), but it is super concentrated and fills about 1/3 of a 5 gallon bucket. For each load you only need 1 tablespoon! The whole batch costs under 20 dollars and should last about 9 months to a year. I personally think it cleans much better than regular detergents and the ingredients are better for you.

- Posted using BlogPress from my iPhone

Location:5th St NE,Rochester,United States

Newspaper Xmas balls


I found this idea on Pinterest. So simple, you just need plastic Christmas balls (I got these on sale for under three dollars... You could also recover old ornaments), mod podge, ribbon, and a spray paint can of silver glitter. I didn't even use a paint brush, just started shredding up the newspaper and modgepodged it on with my fingers :). Then I took them outside and spritzer them with the glitter. I'm not a big glitter girl, but that made quite a difference in the end end effect. The glitter is really subtle and looks more shiny than sparkly. Sadly, I'm going to keep that stuff on hand now, I guess it might be worth using on other projects. I thought of raffia for the ribbons, and I still think that would be cute, but the ribbon was on sale for a buck and was way cheaper. So there ya go, easy, crafty Christmas ornaments.


- Posted using BlogPress from my iPhone

Location:5th St NE,Rochester,United States

Sunday, November 13, 2011

Cutting Deer Soap


So it's been about fourteen hours since I made the deer tallow soap and it seemed ready to unmold. It was stuck in there pretty good and it took a lot of coaxing... ER, hammering... to get it out. Next time I'm going to line the mold with butchers' paper and see if that helps.

Above is the log of soap fresh from the mold. I will say, now I wish I had gone for 3 inch PVC pipes instead of 2 inch... The bars are a little small. I cut some thinner piece to give away as gifts. For myself, I cut some sections thicker so they last a but longer in the shower. There were also some random chucks that I will grind up for laundry soap.


The cutting process. I should use a wire to cut, cutting with a knife is a little tricky and some of the end pieces that were drier and ended up cracking. Not that it affects the soap at all.


... And onto the drying rack they go. Now they need to wait 6 weeks to cure... Which lands them right at December 25 to be fully cured :). The dry pieces smell absolutely amazing.... I think even Equah will like these. Every now and then I grab a piece just to remember how wonderful they smell!

- Posted using BlogPress from my iPhone

Location:5th St NE,Rochester,United States

Saturday, November 12, 2011

Deer Soap


So... My first attempt at using deer tallow for soap. I found a recipe online and altered it ever do slightly:

24.5 oz wt of deer tallow (1 lbs 8.5 oz)
7.5 oz wt of coconut oil
12 oz fluid water
4.5 oz wt lye
1 tsp rosemary essential oil


Coconut oil (in a double boiler)


...addition of deer tallow.


...measuring lye.

So I melted to oils and prepped the lye and water. I meant to do the mixing with a drill with a paint mixer attachment, but the drill was dead as a door nail and I didn't want to wait for it to charge. So, I mixed by hand.

Then shenanigans ensued. I had a nice wide funnel to get the soap into my new PVC pipe molds, but in my ultimate wisdom I waited too long to pour it. There is a point called Trace when you can see drippings leave patterns on the surface of the soap, this is the time to pour. Well I got there, but being a bit paranoid I really did not want to risk my soap separating so I stirred the soap just. A. Tish. More. Yikes, do not do that! Within a couple of whips with the spoon it went from pudding to custard... I grabbed the bowl, popped up as fast as my gimpy ankle would let me, and ran to put in the mold. It was a whole ten feet, but by the time I poured it into the funnel it was like mashed potatoes... So I ditched the funnel and started spooning the glop into the mold by hand. Even this had to be done at a furious pace... The last part was practically set by the time I was pressing it in the mold. There was soap everywhere... Sigh, but I got it in. I am hoping I got all the air out and they still make nice bars. What a mess. On the up side, so far it seems like the soap is going to have a really pretty smell. Can't wait to cut the bars!

Below is the PVC tube of soap wrapped in towel. This is to keep the soap from cooling too fast which can cause the soap and lye to separate... Ruining the soap completely.

- Posted using BlogPress from my iPhone

Location:5th St NE,Rochester,United States

Drain Pipe Soap Mold


Simple and cheap. I just got a 10 foot PVC drain pipe...


... Sawed it into sections (just make sure they will fit in the fridge)...


Rinse out...


And add end caps. Once soap has set in them you can put the tube in the fridge to help the soap contract away from the tube so it slides out easier. Theoretically, anyway. Time will tell how well this works...
- Posted using BlogPress from my iPhone

Location:5th St NE,Rochester,United States

Monday, November 7, 2011

Rendering Tallow from Deer


The tallow above is from the deer we took and will be used for soap. The final product is milk white and very pretty, but it didn't start out that way. I read several different methods for rendering online and finally picked the simplest method. I likely will get more tallow another day and I may try another method then and compare the results. For now, I'm happy with how things turned out.


So this is the tallow we collected from my buck and Joe's doe. We didn't scrape for every last bit, but we collected quite a lot. The was slightly more than pictured here... We started cutting before I nabbed a picture. I rendered the tallow the evening that we processed deer, and only the day after we got them.


The first task was to clean up the fat a bit, cutting off extra prices of meat and tendon that were left from the rough cuts processing the deer. I read that most people will get the tallow coursely ground before rendering. While my family has a grinder, it is currently in my uncle's possession in Iowa. So I opted to just roughly chop everything. And a thanks to my dad for helping with all of this :). If you did have a grinder it would most likely save time and make this portion easier. I also read that you can also use a food processor, but that you must partially freeze the fat first or it will turn into a mess. To me, that process sounds too complicated and is unlikely to truly be worth the effort. This worked just fine.


I believe that completely chopped up we had about 7.5 lbs of fat before rendering. My mom actually helped me trouble shoot a bit as she remembers her parents rendering lard as a child. This is just a large roaster.


The whole thing went into the oven at 225 degrees F overnight... About 10 hours. It likely could have gone more, but at 5 am before I left for hunting it was good enough. I supposed this is a good point to address the smell. Everything you read says the same darn thing, "rendering tallow smells sooooo bad." Well it doesn't smell sooooo bad, and it definitely doesn't stink up a whole room. The smell is slightly unpleasant, but I think that frying hamburger is a similar contender for unpleasant smells.


The set up for straining was just a ladle and a couple pieces of cheese cloth wrapped over another pan. At first I used the ladle, but eventually I just poured it all over the cheese cloth. The chitlins (fried bits) were still quite soaked in tallow so I gathered up the cheese cloth and twisted and squeezed as much as I could from them. The chitlins are basically connective tissues, bits of meat, etc and the tallow is the pure fat from the animal. In processing lard from pigs, I'm told the chitlins are really tasty. I doubt they are from a deer... I couldn't bring myself to try.


The next part is just to ladle it into jars. I used a canning funnel to help out and it went very smoothly.


Here are the jars right after they were filled, the tallow looks quite yellow at first. I put in the liquid hot and as a bonus most of the jars sealed. Tallow, in any container, should last about a year in a cool, dry place. So, I'm not relying on the sealing to really preserve it, but it is kind of nice to know there is some added help there. You cannot can tallow the regular way, you risk exploding fat from the heating process and the tallow itself is supposed to interfere with with how the cans seal. Some people can clarified butter in a similar way with success. I would use common sense and not rely too heavily on sealed cans to preserve the tallow.


Posted using BlogPress from my iPhone

Location:Excel,United States

I know it's the same picture as above, but I had to end with the pretty tallow in the jars again :). I will note that there are some impurities at the bottom of the jars. Next time I may try rendering the tallow in water. The impurities are supposed to sink to the bottom of the water and the tallow just solidifies on top and can be removed. The only disadvantage as it is a bit more complicated than the way I tried. Still, if I try it next time I will be able to compare the two processes.

New lip balm recipe

Lip balm is very easy to make. That said, this is my first large-batch attempt at it. I'm going to attempt to make 50 tubes today. Each tube is .15 liquid oz, so in total I need to make 7.5 liquid oz of lip balm.

To get the balm stiff enough for a tube you need a 3:1 to 4:1 oil to wax ratio. I am shooting more for around 3:1, since with the addition of the flavored coconut oil I am not sure how the result will be affected. So I need about 5.6 oz of olive oil, and 1.9 oz of bees wax. I am starting with the addition of 2% of flavoring (stevia coconut oil) so that would be .15 oz. Mind you lip balms are NOT exact and even if you just winged a recipe you would likely get a decent lip balm. And if you didn't, you simply melt it down and add more of what ever you need. Other products like soap and lotion are not so forgiving.

Sweet Balm #1 Recipe:
(In liquid ounces)

5.6 oz olive oil
1.9 oz bees wax
.15 oz Stevia flavored coconut oil.

So here you can see my 50 tube filled coming into action. The tubes just snap in.


Ready to be filled!


Ingredients and equipment. Olive oil (this I just got from the the bulk section at the local co-op), bees wax, stevia flavored coconut oil (not pitctured). To heat the oil and wax, I just use an old tin can (this one is BPA free). I pinch the end so it make pouring easier. A pirex measuring cup would be great, the only thing to note is that lip balm is a bit annoying, though not impossible, to wash out.


Haha.... You know how I said lip balm recipes are forgiving? Well here you are: after specifying liquid ounces ( the recipe portion of this post was written first and that is what I followed) I went and measured out weight ounces! ...but you will see later everything turned out fine. Here I am weighing out the ingredients. I forgot to mention, you can note above my olive oil is pretty light in color. Save the good olive oils for salad, the later pressings work great for balms and aren't so strong in flavor or smell.


You could try and heat the oils directly, but you run a greater risk of them degrading and scorching. I use a double boiler method using the tin can. You just want to heat it long enough to melt in the beeswax. Then I added in the stevia coconut oil... That was actually kind of tricky. The bottle it came in was not easy to get it out of (at room temp coconut oil is solid). I ended up heating it in the water a little and then just guessed at how much to add.


A note on filling the tray: the balm set up pretty fast and it was a little tricky not to get a layer of extra balm on the tray vs filling the tubes at the other end. I ended up using s Spatula to coerce the balm down. You can see four unfilled tubes, and there is a fifth that is partially filled. In total the recipe... With all it's mistakes... Was fairly close. I got 45 full tubes. I chilled the tube in the fridge to set them, but this isn't necessary.


Next was to remove the tubes and cap them. Minor gripe here was that as I pulled the tubes from the mold it flawed the tops on 90% of them.


There you are, 45 finished lip balm tubes, hopefully destined for Etsy. The sweet flavor is really light, but I like that. The texture turned out nice as well.

- Posted using BlogPress from iPhone

Location:260th St NE,Newfolden,United States

Wednesday, November 2, 2011

Elements Bath and Body haul


So here is what I found in the mail today! I need to do some further price comparisons, but this was the best I could find online so far. I also need to cross check prices with the bulk section of the local co-op (about the only place to find these things). I may even make seperate price comparison pages in the future (the blog serves as kind of a diary and think pad for me). But for now, here is what I got...
Upper left is a pound of bees wax beads that I use for lotions, lips balms, etc. Currently I have beeswax cakes that I have to chop up; this makes both the measuring and cutting time consuming. Though the cakes are cheaper, I think the considerable time gain I get is worth the difference. $7.75 for 1 lbs.

Upper right is 100 chapstick fill tubes... 16 cents a piece. A large improvement from the 70 cent tube I by singly at the co-op. 100 tube for $16.00.

Bottom left (small tube) is stevia soaked coconut oil intended to flavor my lib balms. Obviously I'm aiming for an all natural approach so I went with stevia. Most lip balm flavors are actually more like edible perfumes, but the sweeteners actually add flavor. It's easy enough to get into making balms in 100 different flavors, but really I have no interest in this approach at the moment. I like things as simple as they get. Currently my balms contain two ingrediants: olive oil and beeswax. I find it so reassuring that by breaking things down to their basics, I am often able to make superior products. Yes, I am likely to grow and adapt, but I will always know that things only need to be as complicated as you think it is worth making them. 1 oz of Stevia flavored Cocoanut oil $4.75.

Bottom right is a chapstick tube fill tray.  This will allow me to fill 50 tubes at a time instead of 1 at a time, yay! It was a one-time expense and I think totally worth it. $14.99 for the tray.


An added bonus was that they also sent a little sample pack of things to try. Non pictured is a plastic pipepet... handy though not too durable. From left to right above is their all natural lipchap/body butter base, a fragarance, and a different lipchap sweetener I may try out. Kinda nice, but I would have to further evaluate the quality of these products to see if I would use them in my products. Maybe more blog posts!


- Posted using BlogPress from my iPhone